How to Sharpen and Hone Your Kitchen Knives for Better Cutting Performance?
A well-maintained kitchen knife is one of the most important tools for efficient cooking. Whether you are a home cook preparing daily meals or someone who enjoys experimenting with recipes on weekends, a sharp knife dramatically improves speed, precision, and safety. Many people assume knife sharpening is complicated or requires professional tools, but once you understand the fundamentals, it becomes a simple and highly rewarding skill.

This guide will take you deep into everything you need to know about knife sharpening and honing—from identifying dull blades and choosing the right sharpening tools to mastering angles, techniques, and long-term maintenance practices. By the end, you’ll be able to restore and maintain your kitchen knives like a professional confidently.
Table of Contents
Identifying Knife Dullness and Preventing It
Before learning how to sharpen, it’s essential to understand when your knife actually needs sharpening. Many people continue using dull knives without realizing the performance loss happening over time.
A sharp knife cleanly slices through ingredients with minimal pressure. In contrast, a dull knife crushes or tears instead of cutting. This difference becomes especially noticeable when working with delicate foods like tomatoes, onions, or herbs.
Common signs of a dull knife:
- Tomatoes get squashed instead of sliced
- Herbs appear bruised rather than cleanly cut
- Meat fibers tear instead of separating smoothly
- You need to apply extra force while cutting
- The blade slips on smooth surfaces like onion skin
- Visible nicks or uneven edges appear under light
Another useful trick is the “light reflection test.” Hold the blade under a light source. A sharp edge will not reflect light, while a dull or rounded edge will show shiny spots.
Prevention of Dullness:
Knife dulling is unavoidable.
But you can significantly slow it down by:
- Using wooden or plastic cutting boards instead of glass or stone
- Avoiding twisting or scraping motions on hard surfaces
- Washing and drying knives immediately after use
- Storing knives properly in a block, sheath, or magnetic strip
- Using honing regularly to maintain edge alignment
Understanding dullness is important because not every performance issue requires full sharpening. Many times, simple honing is enough to restore cutting ability.
Types of Knife Sharpeners
Knife sharpening tools come in different forms, each with its own advantages and limitations. Choosing the right tool depends on your experience level, budget, and the type of knives you own.
Comparison Table: Knife Sharpening Methods
| Method | Skill Level | Precision | Speed | Blade Wear | Best Use |
| Whetstone | Advanced | Very High | Medium | Low | Full sharpening & professional results |
| Honing Rod | Beginner | Medium | Fast | Very Low | Maintenance between sharpening |
| Pull-Through Sharpener | Beginner | Low | Fast | Medium | Quick fixes for casual users |
| Electric Sharpener | Beginner | Medium | Very Fast | Medium–High | Fast sharpening with minimal effort |
| Guided Sharpening System | Intermediate | Very High | Slow–Medium | Low | Consistent angles and precision work |
This table helps you quickly decide which method suits your needs. However, most kitchen enthusiasts benefit from combining multiple tools—typically a whetstone for sharpening and a honing rod for maintenance.
Manual Sharpeners
Manual sharpening tools are preferred by chefs and knife enthusiasts because they offer better control and produce a more refined edge.
Whetstones
Whetstones are the most traditional and versatile sharpening tools. They are available in different grit levels, which determine how much metal is removed from the blade.
- Coarse grit (200–800): Repairs chips and restores very dull edges
- Medium grit (800–2000): Restores sharpness and reshapes the edge
- Fine grit (3000–8000): Polishes and refines the blade for razor sharpness
Whetstones require practice but reward you with the highest-quality edge. Water stones are especially popular because they provide smoother sharpening and better feedback.
Key benefits:
- Maximum control over angle and pressure
- Suitable for all types of knives
- Produces professional-level sharpness
- Extends knife lifespan when used correctly
Sharpening Rods/Honing Steels
Honing rods are often misunderstood. They do not actually sharpen in the traditional sense; instead, they realign the blade’s edge. Over time, microscopic bends form along the knife edge. Honing straightens these bends without removing much metal.
Types of rods:
- Steel rods: Standard alignment tool
- Ceramic rods: Light sharpening plus honing
- Diamond rods: Slight sharpening + edge correction
Best use:
- Before or after each cooking session
- Quick maintenance between sharpening sessions
Pull-Through Sharpeners
Pull-through sharpeners are simple devices where you drag the blade through fixed abrasive slots.
Advantages:
- Very easy to use
- Fast results
- Affordable
Disadvantages:
- Less control over the angle
- Can remove more metal than necessary
- May reduce the lifespan of the knife if overused
These are suitable for beginners but not ideal for high-quality knives.
Electric Sharpeners

Electric sharpeners use motorized abrasive wheels or belts to sharpen knives quickly and efficiently. They are popular in busy kitchens where speed is important.
Advantages:
- Extremely fast sharpening
- Minimal skill required
- Consistent results
Disadvantages:
- Less precision compared to whetstones
- Can remove more metal if overused
- Not ideal for expensive Japanese knives
Some advanced models use multi-stage systems with coarse, medium, and fine slots, allowing gradual edge refinement.
Specialty Sharpeners
Specialty sharpening systems are designed for users who want high precision without mastering freehand sharpening.
These systems often:
- Clamp the knife in place
- Maintain a fixed sharpening angle
- Use guided rods or abrasive stones
Benefits include:
- Consistent sharpening angle every time
- Ideal for premium knives
- Reduces human error
They are commonly used by enthusiasts who want professional results without years of practice.
Selecting the Right Sharpening Angle
The sharpening angle plays a major role in determining how sharp and durable your knife will be.
- 20-degree angle per side: Common for Western knives, offers durability and strength
- 15-degree angle per side: Common for Japanese knives, offers sharper but more delicate edges
A smaller angle creates a sharper blade, while a larger angle creates a stronger edge that lasts longer.
Tips for maintaining the correct angle:
- Use an angle guide if you are a beginner
- Keep consistent wrist movement
- Maintain steady pressure throughout strokes
- Practice slowly before increasing speed
Consistency matters more than perfection. Even slight variations during sharpening can affect performance.
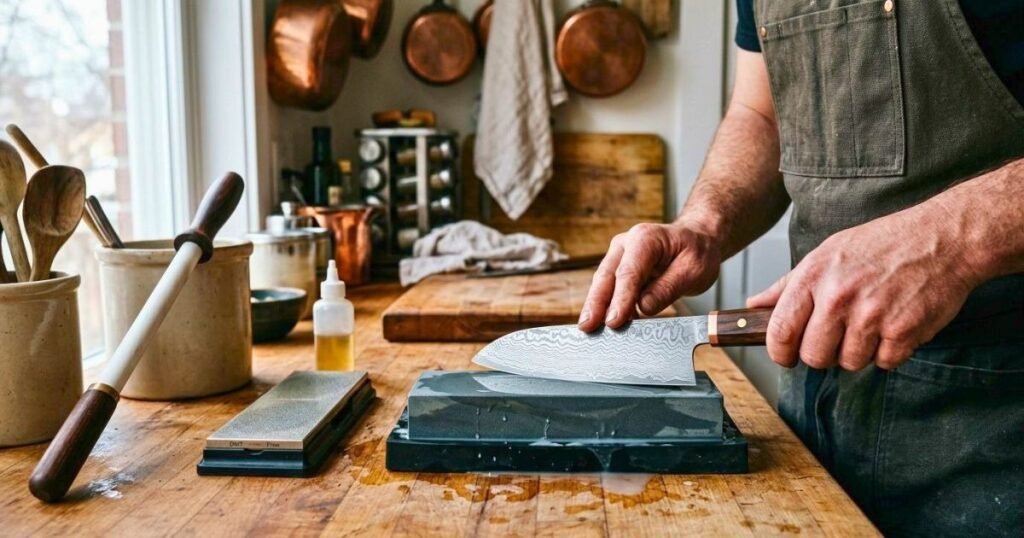
Step-by-Step Sharpening Guide

Sharpening with a whetstone is the most effective method for achieving a professional-quality edge.
Step 1: Preparation
- Soak water stones for 5–10 minutes if required
- Place the stone on a stable, non-slip surface
- Clean the knife before starting
Step 2: Coarse Sharpening
- Use a coarse-grit stone for dull or damaged blades
- Hold the knife at a 15–20° angle
- Push the blade across the stone from heel to tip
- Repeat 10–15 times per side
- Look for burr formation along the edge
Step 3: Medium/Fine Sharpening
- Switch to finer-grit stone
- Use lighter pressure
- Repeat the motion to refine the edge
- Focus on smooth, even strokes
Step 4: Honing
- Use the honing rod vertically
- Slide the blade downward at the correct angle
- Alternate sides evenly
Step 5: Stropping (Optional)
- Use a leather strop with polishing compound
- Light strokes remove the remaining burr
- Produces razor-sharp finish
This full process restores both the structure and the sharpness of the blade.
Checking Your Work
After sharpening, it’s important to test the edge.
Common tests:
- Paper test: The knife should slice paper cleanly without tearing
- Tomato test: Blade should glide through skin effortlessly
- Hair test (advanced): A sharp knife can shave arm hair lightly
- Visual inspection: Edge should look clean and uniform
If the knife fails these tests, repeat fine sharpening or adjust technique.
Common Mistakes to Avoid

Even experienced users make mistakes that reduce sharpening effectiveness.
Frequent errors:
- Using inconsistent sharpening angles
- Applying too much pressure on the stone
- Over-sharpening and removing too much metal
- Ignoring regular honing
- Using low-quality or unstable sharpening tools
- Sharpening serrated knives incorrectly
Avoiding these mistakes will significantly improve blade longevity and performance.
Care and Maintenance Tips
Proper maintenance reduces the need for frequent sharpening.
Best practices:
- Always hand-wash knives immediately
- Dry thoroughly after cleaning
- Store in knife blocks or magnetic strips
- Avoid dishwashers completely
- Use wooden or plastic cutting boards
- Hone regularly before heavy use
Good maintenance habits are just as important as sharpening skills.
Advanced Tips and Troubleshooting
Sometimes knives have deeper issues like chips or uneven edges.
For minor chips:
- Use coarse-grit stone to reshape the edge
- Gradually refine with finer grits
For severe damage:
- Reprofile the blade carefully
- Consider a professional sharpening service
For uneven sharpening:
- Check your angle consistency
- Slow down strokes
- Use guiding tools if necessary
Advanced sharpening is about patience and controlled repetition rather than force.

Frequently Asked Questions: How to Sharpen and Hone Your Kitchen Knives?
Q1. How often should kitchen knives be sharpened?
- Most home cooks should sharpen their knives about 2–4 times a year, depending on usage and how quickly the edge wears down.
Q2. What is the difference between sharpening and honing?
- Sharpening removes metal to create a new edge, while honing simply realigns the existing edge without removing significant material.
Q3. Can I sharpen my knives at home safely?
- Yes, with the right tools, like a whetstone or sharpener, and proper technique, home sharpening is completely safe.
Q4. What is the best tool for beginners?
- A pull-through sharpener or guided sharpening system is easiest for beginners, though whetstones give the best long-term results.
Q5. How do I know my knife is dull?
- If your knife crushes tomatoes, tears herbs, or requires extra force to cut, it is likely dull and needs attention.
Q6. What angle should I sharpen my knife at?
- Most Western knives use about 20° per side, while Japanese knives typically use around 15° per side.
Q7. Can honing replace sharpening?
- No, honing only maintains the edge temporarily. Sharpening is still needed when the blade becomes dull.
Q8. What grit whetstone should I start with?
- A 1000-grit stone is ideal for beginners because it balances edge repair and refinement.
Q9. Why does my knife feel sharper after honing?
- Honing straightens the microscopic bent edge, improving cutting performance without removing metal.
Q10. Can I sharpen serrated knives?
- Yes, but they require special tools and individual attention to each serration.
Q11. What is the safest cutting board for knife longevity?
- Wooden or plastic cutting boards are best because they are gentle on the blade edge.
Q12. How long does a good kitchen knife last?
- With proper sharpening and care, a quality kitchen knife can last decades or even a lifetime.
Conclusion
Mastering the skill of sharpening kitchen knives is one of the most practical upgrades you can make in your cooking routine. A sharp knife doesn’t just improve cutting performance—it changes the entire experience of food preparation by making it smoother, faster, and far safer. Throughout this guide, we explored how knife edges become dull, how to recognize early signs of wear, and why both sharpening and honing play different but equally important roles in blade maintenance. We also looked at various sharpening tools—from whetstones and honing rods to electric and guided systems—each offering a different balance of control, convenience, and precision.
The key takeaway is that consistency matters more than complexity. You don’t need expensive tools to maintain sharp knives; what you truly need is the right technique, proper angle control, and regular maintenance habits. Honing your knife frequently and sharpening it only when necessary will extend its lifespan significantly. Equally important is proper care after sharpening. Safe storage, correct cutting surfaces, and routine cleaning all contribute to keeping your blades in peak condition for years.
In the end, a well-sharpened knife is more than a kitchen tool—it’s a foundation of efficient and enjoyable cooking. Once you build the habit of maintaining your knives, you’ll notice every slice becoming easier, every preparation becoming quicker, and your overall cooking confidence improving naturally.